GeekTool
Right. So my new obsession is GeekTool, because it’s fun and I can customize my desktop with it. If anyone has ever used Rainmeter before, it’s basically the Mac version. (WARNING: THESE TOOLS CAN SLOW DOWN YOUR COMPUTER A LOT!)
You can download Geektool off of Tynsoe.
After the download, it will open up a window split up into two sections: Geeklets and Groups. Geeklets are basically the widgets that you will end up seeing on your screen. Geeklets become part of Groups.
There are three types of Geeklets: File, Image and Shell. The file geeklet allows you to point to a file/document on your computer, and it will display the contents of the file in the window that shows up on your screen. Image is pretty self explanatory. It is linked to an image the same way files are. The Shell geeklet has the most flexibility. I will describe each type of Geeklet and how they are used in detail below:
File:
Once you open up any of the 3 geeklets, two windows will appear on your screen: a geeklet window, and a properties window. The geeklet window will be gray and empty, your task is to fill it with content through the Properties. Inside Properties, the two most used fields will probably be Command and Style.
In Command, you need to insert a “link” per say to your file. Click on the ellipsis next to the text box to expand the field.
A link to a file inside my documents folder might look something like this:
cat Users/bia/Documents/geek.docx
(FYI: make sure to add the “cat”)
Once that is in your Command field, add some style to your geeklet by changing the font, font-size and color. Changing the Refresh setting to a minute or so will reduce the load on the computer.
Image:
Do everything I just showed you for the File geeklet, except have the link point to an image on your computer instead.
Shell:
Shell, as I said before, has a lot of flexibility. This geeklet will give you most of the features Geektool offers. To use Shell, you need to write/copy scripts. Some scripts are easy enough to write yourself (and play with) but others you might need to grab from someone else.
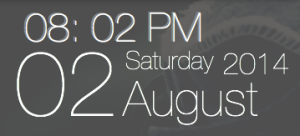
Date and time scripts are the easiest, and most commonly used of them all.
Here is a script to write the time in HH/MM (AM/PM) format.
date ‘+%I: %M, %p’
Here is the date in DAYOFWEEK/MONTH/DAY
date ‘+%A, %B, %d’
If you want to play around with the geeklets you can split the day, month, and time up by placing them into their own separate windows (simply change code to date ‘+%B’ to display only the month) and rearrange them.
(Year is displayed with script date ‘+%Y’)
To add geeklets that display weather, it requires linking to a website (usually yahoo weather) Here is the script for that:
curl –silent “
INSERT LINK HERE” | grep -E ‘(Current Conditions:|F<BR)’ | sed -e ‘s/Current Conditions://’ -e ‘s/<br \/>//’ -e ‘s/<b>//’ -e ‘s/<\/b>//’ -e ‘s/<BR \/>//’ -e ‘s///’ -e ‘s/<\/description>//’
This script will display the temperature in your area and a brief description of the weather. In order to get your weather, go to Yahoo weather and insert your zip code. Copy the URL and paste it where the INSERT LINK HERE is in the above script.
(This script won’t display your location – which I realized later on, so I added it with the code printf ‘MY LOCATION’ Insert the city you live in where MY LOCATION is and it will display it in the geeklet. The printf can be used to display ANY text, and it can be changed pretty easily too.)
I hope this tutorial helps anyone aiming to get started with GeekTool, it is fun – but you might get tired of it after awhile. There are a limited number of scripts out there, so try playing around with the styles or even writing your own script.
Have fun!
Bia


